

Assembling the OilSafe Bulk System with Ease
We understand that the prospect of assembling a large piece of equipment can be daunting, but we're here to assure you that putting together your OilSafe Bulk System is a straightforward and manageable process.
Gone are the days of wrestling with complicated assembly instructions and ambiguous diagrams. With the OilSafe Bulk Tank System, every component has been designed with user-friendliness in mind.
We'll walk you through the assembly process, providing clear and concise instructions for each step. By following these simple steps, you’ll have your OilSafe Bulk System up and running in no time, ready to streamline your fluid management operations.
So, take a deep breath and set aside any assembly anxieties. With a little guidance and a bit of patience, you’ll soon discover that assembling your OilSafe Bulk Tank System is, indeed, a piece of cake. Let's get started!
Unwrapping
You'll receive your OilSafe Bulk System wrapped. Make sure to remove all the plastic wrap and cardboard protection before operating. Use a cutter knife to remove the plastic. Make sure to not scratch the frame or tanks.
Your Bulk System will come with the tanks, labels, filters, hoses, motors and power cords already assembled. Make sure nothing is missing before adding the accessories.
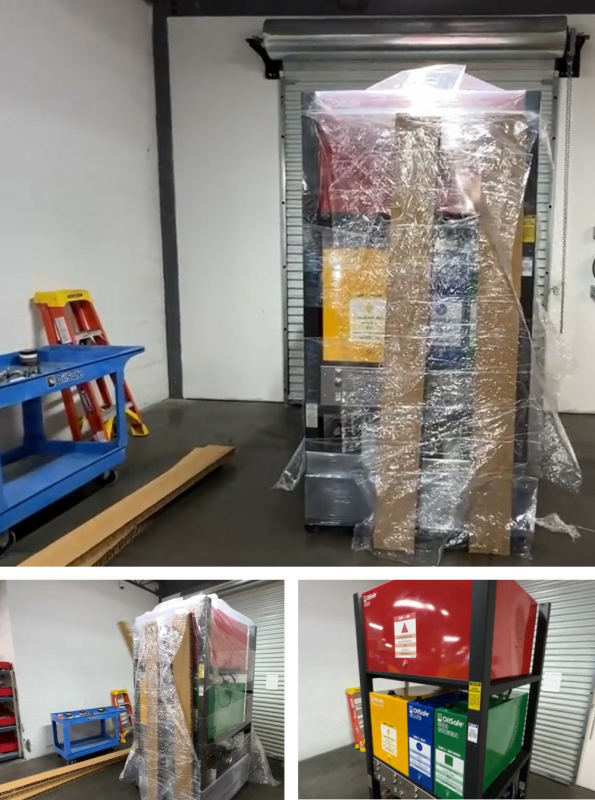 Unwrapping the Bulk System
Unboxing Accessories
After the unboxing of the lubrication storage system, the accessories will be installed.
 Accessories box
Installing Tools
You'll ideally need: PTFE tape, a Monkey wrench, Flat screwdriver, Combination wrench, 7/16 wrench and Cutting forceps. The installing tools are not included.
Content Accessories box

Installing the Desiccant breathers and adapters
To ensure your Tank System remains moisture-free, you'll need to install a desiccant breather on each tank.
Here’s how:
- Install the Desiccant Breathers: Begin by threading the adapters into the designated ports on each tank. You can choose to apply PTFE tape to the threads for an extra seal, but this is optional. Hand-tighten the adapters securely.
- Attaching the Breathers: Remove the plug from the desiccant breather. Thread the breather onto the adapter, again tightening it by hand. If you prefer, you can use a tool to ensure a firmer fit.
- Monitoring the Breathers: It’s crucial to monitor the color indicator on the desiccant breather. It should stay within the green to orange range to keep the fluid level or the headspace of your tank dry and free from moisture.
- Seal Preservation: If the oil system won’t be used immediately, keep the seal on the breather until you're ready to fill the tank with oil. This will preserve the silica gel inside the breather.
By following these steps, you’ll maintain the integrity of your oil and extend the life of your equipment.
 Installing the desiccant breather and adapter
Installing the Dispensing taps
For advanced lubrication source systems, the taps are provided separately. However, if you've ordered a lubrication work center, these taps will already be pre-installed.
- Preparing the Threads: Begin by applying a small amount of PTFE tape to the threads of each tap. Ensure the tape does not cover the opening of the hole.
- Threading the Taps: Thread the taps into their corresponding tanks. Remember to align tank one at the top, followed by tanks two, three, and four in order.
- Aligning with Quick Disconnects: Make sure each tap aligns with its color-coded quick disconnect for easy identification and use.
 Dispensing taps
Installing the float level gauges
To ensure accurate fluid monitoring, follow these steps to install the float level gauges on your OilSafe Bulk System:
- Preparing the Threads: Apply PTFE tape to the threads of both the float level gauges and the adapters for your desiccant breathers. Ensure the tape is wrapped in the correct direction to avoid unravelling when threading.
- Installing the Gauge Probe: Locate the two arrows on the back corner of the gauge. These arrows indicate how the float mechanism moves and should be pointed to the back of the machine. This orientation prevents the float from hitting the sides of the tank.
- Threading the Gauge: Carefully thread the gauge into the tank, ensuring the arrows remain correctly positioned. It's more important to get the arrow alignment right than to over-tighten the gauge. If needed, you can use a wrench, but prioritize correct arrow positioning over tightness.
- Double-Checking Position: Verify that the float level gauge is in the right position by ensuring the arrows are pointed back. This ensures full articulation of the float arm, allowing accurate fluid level readings.
 Installing the float level gauge
Static Discharge Grounding Reel: Essential for Safe Fuel Transfer
Static Discharge Grounding Reels are crucial for safely grounding static charges during the transfer of combustible fuel and other flammable liquids. The OilSafe® System includes spring-operated automatic retrieve reels with standard steel aircraft cable. These compact reels are designed for convenient mounting to your OilSafe® tank frame, providing constant spring tension to prevent cable tangling.

Key Features:
- Construction: Made of durable steel with a 100-ampere ground clamp and rubber-covered bumper.
- Convenience: Instant-acting lock and release mechanism for ease of use.
- Mounting: Designed to be mounted on the front face of the OilSafe® tank frame using provided threaded holes.
Usage Tips:
- Careful Retraction: When reeling the cable back, maintain tension by walking the cable back to the reel—never let go of the cable.
- Locking Mechanism: The cable stop assembly can be adjusted to any position, and the lock engages by pulling the cable approximately ½". The lock release knob disengages the lock for constant tension.
Installation:
- Mount the Reel: Securely mount the reel on the front face of the OilSafe® tank frame.
- Attach the Cable: When filling the tank, attach the static discharge cable to the drum

When filling Bulk Tanks from drums always ensure the Static Discharge Clip is connected to the drum before starting the pump.
Drip tray + Stainless steel grates
One of the final accessories to install on your System is the drip tray. This essential component ensures a clean and safe workspace by catching any spills or drips.
Key Features:
- Drain Plug: Each drip tray comes with a drain plug at the bottom for easy cleaning and maintenance.
- Stainless Steel Grates: Your OilSafe containers will sit on sturdy stainless steel grates, providing a stable and secure platform.
- Grounding Nuts: Located on each corner of the drip tray, the grounding nuts ensure that the tray can be effectively grounded to the frame of your OilSafe system.
Installation Tips:
- Position the Tray: Place the drip tray so that the grounding nuts are oriented towards the frame.
- Ground the Tray: Securely ground the drip tray to the frame using the grounding nuts.
 Grounded drip tray
Built-in Safety Features of Your System
Let’s take a moment to highlight the essential safety features integrated into your System. These features are designed to ensure safe operation and to protect your investment.
Key Safety Features
Fusible Links: Each tank is equipped with a fusible link located on the underside. In the event of a fire, the fusible link will activate, automatically shutting off fluid flow if the hose becomes disconnected. This prevents potentially hazardous fluid leaks.

Emergency Pop-Up Valves: Our tanks are also equipped with UL-rated emergency pop-up valves. These valves are designed to open at 2.5 pounds of pressure, providing a safety release in case the tank is overfilled.

These built-in safety features ensure that your OilSafe System operates safely under all conditions, providing peace of mind and protecting your equipment from potential hazards.
Setting Up and Using Your OilSafe System
When you receive your OilSafe System, you'll notice that each system comes with a dedicated, colour-coded suction wand that matches the colour of the tank. These adapters are designed with dripless, flat-face couplers, ensuring a clean and efficient connection. The colour-coding and pinned connections prevent any mix-ups, ensuring you connect the right hose to the right tank.
Step-by-Step Setup
Preparing to Fill the Tank:
For this example, we'll set up the red tank.
- Drop the red suction wand into your 55-gallon drum.
- Connect the static reel to your drum.
- Attach the adapter to the input port located below the tank.
 Preparing to fill the tank
Filtration Modes:
Uploading: Transfers oil from the 55-gallon drum into the tank, filtering it in the process.
Kidney Loop Function: Cleans and polishes the oil once it's in the tank.
Dispensing: Dispenses filtered oil from the tank.
Controlling the Modes:
The three modes are managed by two three-way ball valves located below the tank.
Detailed instructions for each operation are provided on the nameplate on the left-hand side of the system.
 Operating valve positions
Filling the Tank
Set the Valves for Filling:
- Left valve: Up position.
- Right valve: Up position.
Start the Filling Process:
- Lift the left ball valve.
- Press the start button to begin the upload process.
Completing the Filling:
- Once the tank is filled, shut off the pump.
- Remove the quick disconnect and place the caps to keep everything clean.
 Fill process - both valves in up position
Recirculating the Oil
Importance of Cleanliness:
Oil from the manufacturer may not meet cleanliness standards. It's recommended to recirculate the oil several times before use. Industry standard suggests filtering the oil seven times across the filter.
Set the Valves for Recirculation:
- Left valve: Down position.
- Right valve: Up position.
Recirculation Process:
- This will move the fluid at about 3 to 5 gallons per minute.
- For a 120-gallon tank, run the system to recirculate the oil seven times to ensure cleanliness.
 Recirculation process - left valve up and right valve down
Dispensing the Oil
Prepare for Dispensing:
- Remove the lid from your OilSafe container.
- Turn on the pump and set the system to dispense mode.
Set the Valves for Dispensing:
- Both valves should be in the down position.
Dispense the Fluid:
- Dispense the clean oil into your colour-coded containers.
- Once done, turn off the pump.
 Dispense mode
By following these steps, you ensure that your OilSafe System operates efficiently, maintaining the cleanliness and quality of your oil.
Electrical Requirements for Your OilSafe System
Ensuring your OilSafe System is properly powered is crucial for safe and efficient operation. Here’s what you need to know about the electrical requirements:
- Dedicated Circuits: Each tank, pump, or motor requires its own dedicated 20-amp circuit.
- Voltage Options: Our systems can be configured to operate on either 120 volt or 240 volt single-phase power, offering flexibility for different setups.
- CE Certification: All OilSafe systems are CE certified, meeting strict safety and performance standards.
- 20-Amp Plugs: We provide 20-amp plugs for each system, and these plugs are numbered to correspond with the respective motor, simplifying installation and ensuring proper connections.
 Electrical requirements
Essential Maintenance Tips for Your OilSafe System
Maintaining your OilSafe System is straightforward but crucial for its longevity and efficiency. Focus on these two key components:
Desiccant Breathers:
Function: Desiccant breathers remove moisture from the air, protecting the headspace of your tanks. While the tanks are made from 100% aluminum to prevent corrosion, controlling moisture levels is essential to avoid water contamination in your oil.
Maintenance: Each breather has an indicator that changes colour from gold to dark green. When it turns dark green, it means the breather is fully saturated with moisture and needs to be replaced.

Fluid Filters:
Function: The 14-inch fluid filter elements provide long-lasting filtration for your system.
Maintenance: Despite their durability, it's recommended to replace these filters at least once a year. The filter heads feature a differential pressure indicator, which turns red when the filter elements need to be changed.


By regularly checking and maintaining these components, you ensure your OilSafe System continues to operate smoothly and effectively.
Thinking about getting a Bulk System but not sure about assembly? Let the ease of setup convince you!
Contact us today to learn more
